Beauty and serenity is all around us, it lies in the forgotten, the hidden and the ignored - we
must look in the shadows and search if we are to be truly at ease in this world. Carly Johnson

Wednesday, October 27, 2010

Easy-Peasy Fudge


~Ingredients~
125ml milk
110g butter
200g peanut butter
475g light brown soft sugar
425g icing sugar
1tsp vanilla extract

~Equipment~
hob
wooden spoon
large saucepan
timer
20x20 lined tin
fridge
knife

1.  Melt the butter in the saucepan on a medium heat.
2.  Stir in the brown sugar and the milk and bring to a rolling boil stirring frequently.
3.  Set timer, and boil for 2 minutes, continually stirring at a slow speed.
4. Remove from heat and stir in the peanut butter and vanilla extract until smooth.
5. Add the icing sugar and beat until smooth.
5. Pour into tin and chill until firm.
6. Cut into chunks, et voila!

TIPS
*If you don't want tiny chips of nut in your fudge then make sure you opt for smooth peanut butter
*Make sure you use light brown sugar - I tried another batch with dark brown sugar and it tasted like bonfire toffee!
*I tried using olive spread in a chocolate version but the fudge never set completely so I ended up dipping rolled balls into chocolate.
*This recipe makes A LOT of fudge - I ended up freezing 2 thirds of it for a later date

Wednesday, September 29, 2010

Homemade Candle Tutorial


I thrifted an old cheese pot a while back but I was unsure what to do with it....then it hit me, as part of a hamper it could be a candle!! So here is my tutorial for you to do the same - this is my first ever solo attempt at making a candle (I made one when I was a child with my dad but it didn't even burn!)....

1. Gather supplies:

  • a container (one that can withstand heat or its just going to melt along with your candle - or worse still, combust and burn your house down!),

  • some wax - you can use old candles, unused candles, broken candles it really doesn't matter so long as they are wax of some sort, ie. beeswax, paraffin wax etc

  • essence oil - only if you want your candle to smell of a particular aroma or your wax is unscented

  • a double boiler - to melt your wax in

  • a stirrer - to stir your wax with

  • heatproof gloves - to protect your hands (obviously)
2.  Melt the wax:

  • break the candles into smaller pieces, grate or slice - if you freeze the candles for a few hours before hand they should crack into chunks quite easily

  • put the wax into your double boiler - I don't have one of these so I use a large saucepan half filled with water with heat-proof containers sitting inside - I found using an empty tin can worked the best

  • if you left the wicks in the chunks of candles, fish them out now - if the pieces are long enough lay them flat on some wax paper, foil or paper bag and store (when cool) for another project - it saves buying wicks from a craft store!

  • add the essence oil - if you are scenting your candles now is the time to add the aroma - you only need a few drops (honestly, I didn't think it would be enough so I added about 10 drops - now my candle is probably too strong and the house (more so my hands) stinks of Christmas Spices!
3.  Pour the wax and leave to cool:

  • Carefully take your pot of melted wax (use heatproof gloves to hold it if the container is hot) and pour the wax slowly into your chosen container

  • INSERTING THE WICK - you can glue the bottom of the wick into place beforehand, pour a small amount of wax in and embed your wick whilst it cools, pour all the wax in and then as it sets poke in a stiffened wick, or cheat like I did - when I chopped my candles up into smaller chunks, I measured how long I wanted my wick to be and then chopped the candle to fit and melted the rest of the wax.  I poured a small amount of wax into the bottom of my container and bonded my shortened candle to it, then poured the rest of the melted wax around it, all the way to the top.  The heat of the melted wax should melt the edges and bond nicely together (which it did)

  • I put sticky tape around the rim of my container to stop any wax from cooling where I didn't want it to.  I also covered the top of the wick with a bit of sticky tape so that didn't get covered either.

  • Secure the top of your wick to keep it in place - if your wick is long you can wrap it around a pencil, or clasp it in a clothes peg, or use a bit of sticky tape as I did.
Et VoilĂ !  You may find that the wax will create a 'sink hole' as it cools - don't worry you can always top it up afterward.  The first time I made my own candle I poked at the top to try and prevent the sink hole effect but the shrinkage still occurred, hence the messy top shown in the photo*!  I this case, patience is definitely a virtue.

It is best to have more wax than you think you will probably need - you can always allow any extra wax to cool and then it can be melted down again for the next project but if you don't have enough to hand in the first place, your candle will go unfinished.

WARNING: NEVER melt wax in a microwave as it can combust!  Obviously certain items may become extremely hot during this project so caution is to be taken at all times - NEVER leave melting wax unattended. 

**to smooth the top of your candle run your hair dryer across the top to melt it a little - be careful the jets of air dont fire the wax back up in your face!**
TOODLE-PIPS
xx

Upcycled Present for Teenager

A vintage tin.....
but what is inside?


A spotted mustard tie-wrap watch with matching mustard pashmina!


My neice is 13 and VERY trendy so what do you give a young fashionista who has everything already?  Never mind keeping up with the Jonses...let the Jonses keep up with you!  The watch strap used to be a mans tie and the watch face used to be a watch (obviously)  with plain old tired straps - now its a funky tie-wrap watch (and yes I made myself one first - for test purposes only of course *wink wink*).  The pashmina was thrifted "as new" (it still has its original tags on!) and the tin was a tin but its an old and battered unloved one - it was slightly rusty dusty inside so I lined it with snipers tape, which is basically just a stickybacked fabric in fat-ribbon form - the watch holder is just a cut up kitchen towel roll stuffed with newspaper and covered with snipers tape.  I rolled the pashmina up and placed the watch in the centre - et voilĂ !!

I'd be interested to know what was originally inside the tin so if anyone knows feel free to leave a comment below

TOODLE-PIPS
xx

Thursday, September 23, 2010

Raising Money for the School

Last year, to raise money for the school, they held a Christmas shopping evening where local people could 'buy' a table and sell their wares - it was suggested that I go and sell some of my crocheted items - I went, I sold, I took orders and I learned that I didn't really want to do it again - my mania had crashed long before then so I literally had to drag myself there to see at least one thing out that year!

So, this year they may be holding another shopping evening (I've not actually found out for sure yet, but if not they always have a Christmas Fayre and that would be as good a place as any - why they could even do it at both!)  This year, I am going to make things to be sold except I'm not going doing it for personal gain.  Instead, 100% of the money taken will go straight back to the school - and what am I selling?  Upcycled Gift Wrap of course!  Here is my plan:

60 packets of ribbon @ £2 each = £120
60 packets of bows @ £2 each = £120
60 packets of tags @ £1 each = £60
TOTAL = £300

I think that's pretty good going just for giving up a few evenings of my time don't you?

Although I'm dubious as to how much people should pay for the gift bows, the come in packs of 8 so I'm not sure whether the school should charge £1, £1.50 or £2 - how much would people be prepared to pay? The more money they charge the more money they make, but if something is too dear then less people might buy them and the school could actually make less money - see my dilemma - maybe I should just let the school decide after they know their options.

Two reels of ribbon takes 10minutes and I managed to do ten of them today - only fifty more to do then! - but I find them strangely enjoyable to do (maybe its because there is a screwdriver involved, plus the fact its super quick?) but it is with the bows where in lies the rub!  60 packets of 8 bows means 480 bows in total and as there are 10 squares to each one (9 of which are folded) there are 4800 squares!!!  It seems a never ending task, and then when those are complete I'll have to start on the 480 gift wrap tags with pre-cut strings!!

Luckily I haven't actually informed the school yet so if it never comes to fruition I haven't let anyone down, but I'd love to see their faces when I donate all this stock that they can sell - it would almost be as good as writing the cheque out myself (if I had that kind of money to just give away of course!).  Wish me luck....

TOODLE-PIPS
xx

Monday, September 20, 2010

Knitting Needle Bracelets Tutorial

Got some knitting needles but cant knit?  Don't throw them away, turn them into bangles instead!  This tutorial is for PLASTIC knitting needles only! Do not try to melt the aluminum ones in a pan, it probably isn't going to work.  WARNING: the plastic may give off toxic fumes so make sure you are working in a well ventilated area and that you are wearing a mask - also some of the chemicals may be absorbed by your pan so it is best to use one that you are not going to cook with.

1.  Place your knitting needles in a pan of boiling water - treat them like you would spaghetti if your pan isn't quite big enough (but don't simmer them) -  and boil for 10-15mins.
2.  Use tongs to fish one out.  Test to see if it is pliable enough to bend to shape.  If not keep boiling for a bit longer. 
3.  Wrap the needle around a glass or other cylindrical shaped object you have - remember to use oven gloves as the needle may be hot.  I have asbestos hands (so says my husband) so I hand shaped mine as I found it easier - I did burn my thumb slightly in the process so don't say I didn't warn you - I found the non-pointy ends retained the heat, that's what I burnt my thumb on!
4.  Hold in place until cool and set or put them into a bowl of cold water to speed the process up.
5.  Leave on a towel or draining board to dry.
6.  Don't worry if the shaping has not gone to plan - you can always pop it back in to boil and try again - don't force your needle or it may break.

* you may find that the "knobs" or labels may come off in the boiling process - don't worry you can always glue these back on afterwards.

Here are some close-up shots of a couple of bangles:

You could also maybe try making brooches by bending one into an S shape and keeping the other straight - great for a wool shrug maybe?

TOODLE-PIPS
xx

Trinket Box Makeover

This is a Christmas present for my neice Hope - her favorite colour is light blue, and by chance the drawers were already lined with blue cord material so it saved me a job on that front.

TOODLE-PIPS
xx

Sunday, September 19, 2010

Up Up & Away....


I finally finished all the upcycled gift wrap!!!

The gift tags: made from cutout leftovers on the book clock projects - do you like how I packaged them to form a heart?  The strings are wool taken from my 'crochet-crazy' days last year.


The flower bows: made from cutout leftovers on the book clock projects - I added double sided sticky pads to the back so you can easily attach them to wrapped gifts.

The ribbon: this used to be video cassette tape - there are roughly 90mins worth on each reel (also from the video) I'm not sure exactly how much in length there is, but I originally unwound 10metres and it hardly made a dent so I estimate there to be well over 100metres on each reel - if anyone wants to unwind the entire length of a 187min long film tape could you be a star and let me know? Thanks.

Just the soaps and sweets do do next, oh, and working out what the actual hampers are going to be made from!

TOODLE-PIPS
xx

Saturday, September 18, 2010

Kids Kraft: Chocolate Refridgerator Cake

You will need:
~ Ingredients ~
175g unsalted butter (chopped into small chunks)
150g chocolate (broken into pieces)
2 tablespoons of golden syrup
250g digestive biscuits
200g cherries (cut into quarters)
~Equipment~
Prep; knife, chopping board, scales
Microwave safe bowl
Wooden spoon
Polythene bag & tea towel
Rolling pin
Greased baking tin (aprox 20cm x 30cm)

What to do:
1. Put the butter and chocolate in a microwave proof bowl and zap it for 60 seconds.  Stir with a wooden spoon and cook in microwave for a further 60 seconds. Stir with a wooden spoon.  The butter and the chocolate should have melted by now - if it hasnt keep cooking on 30second intervals until it has.  Add the golden syrup and stir until it is all mixed in together.
2.  Place the biscuits in a polythene bag and cover with a tea towel, then crush them with a rolling pin.
3.  Add the biscuit crumbs to the wet mix and stir until all the crumbs have been coated.  Add the cherries and mix them well.
4. Spread the mixture into a greased baking tin and press down with the back of the spoon.
5.  When the mixture is completely cool, cover with clingfilm and refrigerate for at least 2hrs.
6.  When the cake has set cut it into squares.
7.  Enjoy your cake!!

*Try swapping/combining the cherries with raisins, nuts or mini marshmellows - let your imagination run free.
*Try using different chocolate for differnent colours and taste, or combine 2 mixes to create swirls in the baking tin.
*After cutting you could package them up into boxes or bags and give away as gifts
*If you have really small children the adult could do all the cutting up beforehand, then the rest is pretty much safe for the little ones to do by themselves; although the mixture shouldn't get hot I do recomend that an adult takes the mixture out of the microwave.

My daughter made this at school and then came home with the recipe to make it again.  We have to take a picture, print it off and send it back in to school.  Both my daughter (6) and my son (3) stood on steps at the counter and made it together - yet again I forgot to take photos so we're going to make it again closer to Christmas so we can wrap the squares up and give them away as gifts.

TOODLE PIPS
xx

Quantity Vs Quality

Just because you do a lot of research doesn't necessarily mean that you have done the right research.  It is no wonder then that I found the whole process of rebatching soap completely unexpected.  This morning I found this tutorial video from Soap Queen


If you look through the rest of the site you can find a whole host of wonderous How-to demonstrations all about soap and related products.  I think she's fab!

TOODLE-PIPS
xx

Friday, September 17, 2010

QI catchup


Its the first of a new series and I missed it! But why did I miss it? Because I was making my first batch of upcycled soaps! Well tonight, this is my bit of info that may be just Quite Interesting:

Now, after a lot of extensive research into the making of soaps, and to be honest I used to work for Lush in their Bubbles department making solid bubble bath so I know how hard and complex the process of making soaps from scratch can be, so I decided I would melt down existing soaps and pimp them out.  The process of melting and reshaping soap is called rebatching and tutorials all across the Internet make it out to be very simple and very quick - simple, yes.  It is not, however, quick.

I started with the chocolate soap because I wanted to make chocolate chips to put in the soap cookies - it seemed to go from bad, to worse, to thinking I probably shouldn't have even bothered, to melted liquid soap.  The recipe called for cocoa powder but I didn't have any of that so I used the next best thing....Cadbury's drinking chocolate....except when I shook it in (yes I know, a sensible person might have used a spoon) I kind of slipped and shook too much in - d'oh! - and I could hardly spoon some out and put it back in the jar (soapy hot chocolate....mm mm nice!) so I just stirred it all in and put it back in the microwave for another 30seconds just for good measure.

Now, I have never made chocolate chips before and I thought as long as I could come up with some sort of pipette, that they should be easy to make.  Ha! Again, I was mistaken - I didn't have a pipette and my son seems to have absconded with the big medicinal syringe we have and promptly hidden it, so I used the only thing I could think of.....a straw.  I sucked up some soap mixture and then removing my finger from the top end it dripped onto a foil lined baking tray.  It didn't form a small peaked chip, just a small splodge, and it was slow and tedious work.  After a while I gave up and just poured the rest of the mixture into some tiny silicone cupcake cases and left them all to 'set'.  I grated half a bar of soap and produced an over sized coffee mug worth of chocolate mixture. Amazing how it seems to grow in volume four-fold.

Next for the cookie dough.  Real cookie dough is smooth and then crumples up when baked so I had to work out how to make this crumpled up texture.  I grated a whole bar of soap and added it to the scrapings of the chocolate batch and topped with water. Put it in the microwave and stirred it every 60seconds until it melted.  This time, the mixture was not melting so good, so I kept adding a bit more water, and then it still didn't melt, so I added some vanilla essence (no, not essence oil like all the recipes state, actual vanilla extract that you would use in normal baking).  After some more zapping the mixture still wasn't smooth enough and it seemed extremely dark brown in colour (the chocolate scrapings were minimal, maybe it was the overkill on the drinking chocolate that made them super strong?) so I thought "hey, some of the recipes showed they used goats milk in them" and I'm sure you've guessed by now that I didn't have goats milk either, just plain old semi-skinned milk.  In the end I added quite a lot of milk (I wish I'd bought more than 2 pints now) but it mellowed out the colour so its did the trick.  Then I added the oats (OK, OK, ready-oats which are just the shops own brand cheap version of Ready-Brek).

I was under the impression that as the soap mixture would cool it would go from a smooth liquid into a more stodgier one and so on until it turns into an almost pliable crumbly mess....and hey ho....I was right.  Shaping some by hand into cookie shape and size I then poked in the chocolate chips (I initially wanted to stir them in like you would on normal cookies but the chocolate soap hadn't seemed to have set hard enough yet).  I ended up poking chips into both sides because I thought it most likely that people would view them from either sides and I wanted them to appear as cookie-like as possible.

I managed to make 16 out of the mixture with no leftovers - amazingly fluky because I only wanted 16!
They are sat atop of the oven 'setting' for the next 48hrs.  When I have watched QI on BBC iPlayer and then taken myself off to bed, I will take photos of them, most probably tomorrow (hopefully my kids wont have tried to eat them - they have been told they are NOT edible because they are soap - but you never know with kids!) and then put them to this post.

TOODLE-PIPS
xx

Busy Busy Bumble Bee

Ok, so I'm not small and fuzzy with a deadly sting in my tail (unless seriously miffed off!) but I do wear alot of black and I am starting to incorporatte some colour into my wardrobe, albeit not yellow just yet but more to the point I have definately been buzzing around doing bits and pieces here and there.  My brain has been buzzing too and the old cogs have most certainly been grinding away non-stop.  I'M SO EXCITED!!!
I finally finished packaging my gift bows but during the 'required rest period'  by my printer (I think its male) a light bulb moment arose and I already have my new project all worked out! Its not Neighbours or Eastenders but it most wonderously a soap - but its going to be a very clever soap - a very clever soap indeed! So clever infact you'll find it hard to resist eating it.  All designs are confidentially under wraps until they are made and packaged up of course (more to the fact that they may turn out completely wrong) but I will be sure to post pictures and a write up when they are finished, and yes, they are yet more christmas presents!
Right, I'm off to grate some soap bars....

Wednesday, September 15, 2010

Thinspiration - in more ways than one...

Well, I am certainly multi-tasking these last few days, either that or my concentration span is seriously short at the moment. I was going to post yesterday but I couldn't find the right picture to describe how I felt - 'blue' just didn't cut it. I think the mix of insomnia (I'm into my 8th week now), the peak of this constant cold I seemed to have had pretty much since Spring, husband being away and all the niggles that seem to be never ending just totted up and spilled over. I seem remarkably improved today, joyous even, despite our excursion to the Emergency Eye Clinic after my son poked himself in the eye with a whiteboard marker - no need to worry, he has a small hemorrhage which should have cleared itself up in about 10 days - the hospital staff were rather impressed with his eyesight too - my children are superhuman - no...really.

Anyhow, I finished making 80 gift bows intended to be given away at Christmas along with other upcycled gift wrap, so today I spent all morning designing my 'brand' and the labels to go with it. Then, as usual, I got carried away and thought "hey, why not create another blog, but this time purely for upcycling"....so I did: RENAĂŽT breathe new life...  I finally got to use my logo I designed donkeys ago for upcycling (pictured left) which not only features itself  on the new blog but also on my packaging labels - which coincidentally are the same as the blogs header - so naturally I gave my British & Barmy blog a shout-out too. 

I made lots of clear bags from old plastic wallets chopped into quarters, printed off my labels, cut out brown header-tabs (OK, so I've only actually managed 5 of these so far) from a store paper bag, stuck the label on, put the ensemble together and stapled shut.  Then took a photo.  I have 11 more to do but I will save them for another time - then to start all over again to bag up the gift tags.  I'm going to make the ribbon out old VHS video reel, but I've not got as far as smashing the cassette up yet - I'm hoping to work out how I can open it so I can make something else out of it afterwards.  Optimistic maybe?

One more thing.....I'm trying to rack my brains for Kids Kraft ideas - they need to be easy, quick and produce (almost) instant results, and look good at the end (obviously) - so far its proving to be impossible.  My girl is 6 and my boy is 3 so finding something they can both do is proving to be tricky.

So, I'm thinking thin (PMA and all that) and inspiration is pretty thin on the ground too (and also concentration and sleep)

TOODLE-PIPS
xx

Monday, September 13, 2010

Kids Kraft: No Sew T-shirt Cushion Tutorial

We made 4 of these t-shirt cushions over the weekend - they really are that easy and require no sewing what-so-ever!!  Unfortunately I got so caught up in the fun of it all that I forgot to take photos for a tutorial post so I spent a few minutes just now doing some (very) simple drawings on paint - next time the kids let loose on an oversized t-shirt I will have my camera ready!
1.  Lay your t-shirt (the bigger the better) out flat, place your cushion pad down and draw around it with some tailors chalk (the blue line) then draw another line about 2inches out (the red line). 
2.  Cut along the red line making sure you go through both the front and back layer of the t-shirt.
3.  Using the picture as a guide mark lines (the red lines) about 2cm apart all the way around - take note of the corners, you want a tab coming straight off from each one.  Cut along these red lines going only as far as the cushion pad outline - discard the 2 triangles either side of the corner tabs.
4. Take 2 corresponding tabs from the back layer and the front layer and tie them together with a knot.  It is easier to start with each corner and the middle one on each side - inserting the cushion pad before doing the fourth side.
5.  Continue knotting the tabs all the way around untill they are all done.  You can leave the cushion like this if you like the tassles as they are.
6.  Alternatively you can take one tassle from each pair and knot it to another tassle from the pair next to it, and so on, all the way around.  This should make the tassles lie flat against the cushion which means you can easily poke them inside to hide them, giving you a strange knotted-piping effect along the edges.
7.  Plump, relax and enjoy.
 
If you are making them as gifts then you can easily wrap them in clingfilm to keep them clean, ready for when you want to wrap them properly.  I know clingfilm isnt the most eco-friendly thing out there but when it comes to crafts and the kitchen is a seriously handy thing! More importantly it can be rinsed and re-used (with-in reason of course, hygeine not with-standing) and if you do happen to throw it away, keep in mind that it can be rolled into teeny-tiny little balls - effectively taking up less space in those dreaded landfills.
 
TOODLE-PIPS
xx

Anyone got the time?

I finished another bookclock the other evening and made two more today - thats 5 now in total - I'm on a roll!! Here are the results....

To create the distressed look I rubbed the cover with a cotton pad soaked in nail-varnish remover - I was trying to remove some permenant pen I had got on it (mistakes were rife with this bookclock!) and one thing led to another until I stopped fighting against it and just went with the flow.  I tried to recreate this technique on the 20'000 Leagues Under The Sea one by testing it out on the back cover - alas it did absolutely nothing and the print remained intact - maybe it has something to do with the manufacturing process of the book? 
TOODLE PIPS
xx

Clockbook Tutorial

As promised, here is a tutorial on how to turn a book into a clock.  You will need: a book, a clock, a drill, a pencil, a ruler, a knife and some glue.  A selction of different sized drill-bits and some sort of sticky-tape may also come in handy.
*Hints & Tips*
*Choosing the right book: you can choose any hardback book you like as long as it is thicker than the depth of the clock-box that holds the mechanism and battery, and you no longer want to read it of course.  Please make sure you gain the owners permission first if the book does not already belong to you.
*Choosing the right clock: make sure that the clock hands will not extend past the edges of the book once complete.  Also, make sure that the depth of the clock box is less than the thickness of the book.  You may need to choose another clock or book if either of these issues arise.  Again, make sure you have permission to dismantle the clock.
*Choosing the right sized drill-bit: a good measure is the original clock's face-template (the bit with the numbers printed on it), if it doesn't fit through the bit is too big, if it fits through and you can wiggle it about still, then it is too small - try to find one that fits the best.
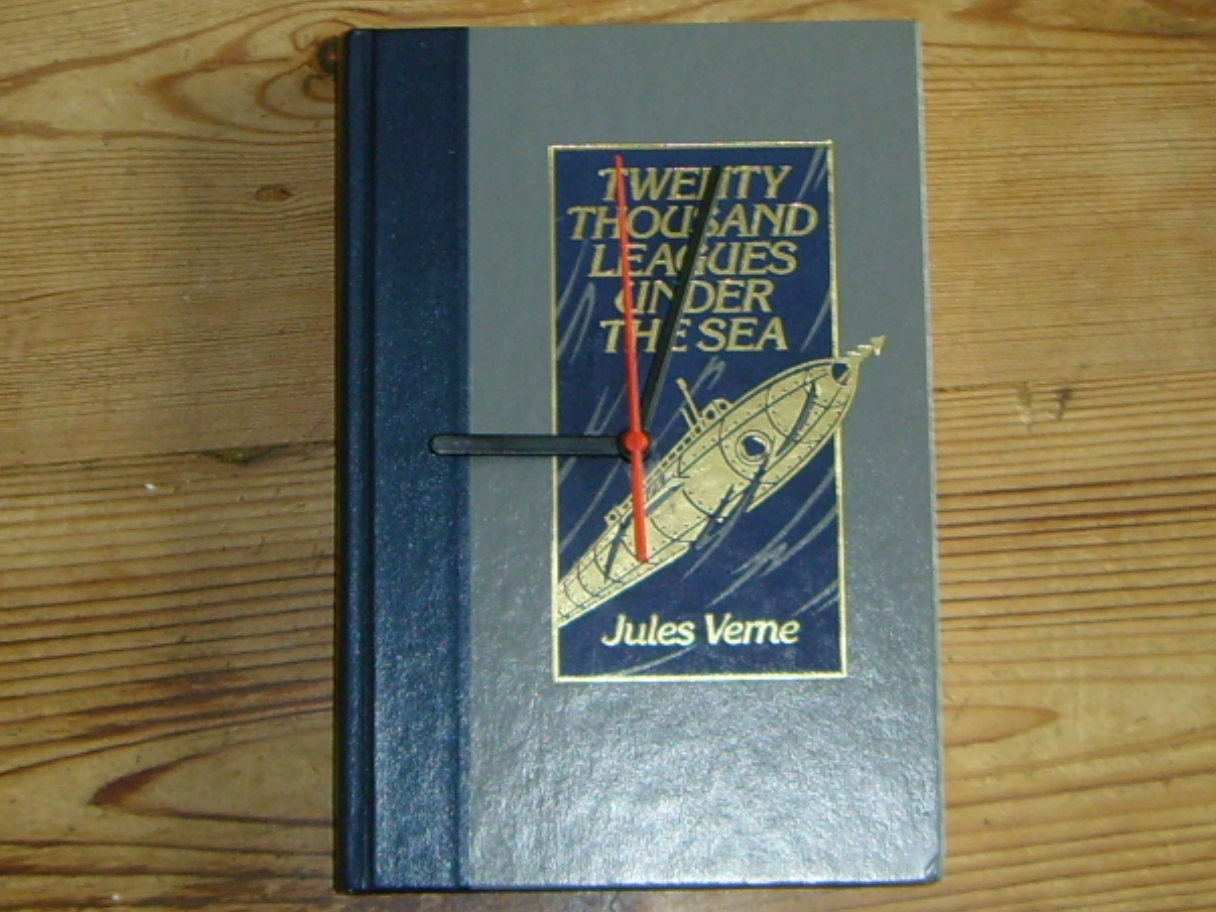
*Marking where to drill the hole: for most of my book clocks I chose the dead centre of the book - to find this, use the ruler along the bottom, mark the middle, then repeat along the top.  Place the ruler against these two marks and then find the middle again - this should be the exact centre.  It is always best to double check your measurements before drilling the hole.  You can also lay the hands down to ensure it will be aesthetically pleasing when complete.  The book I used for this tutorial had a nice circular design on its cover so I chose to use the centre of that pattern as the place to drill my hole.
*Marking where the box will sit: when you drill your hole, if you keep drilling a little bit further into the book it will leave a small nook in which you can flip the clock box over and work out where the box will sit.  Leave about a half centimetre gap around the box - it makes it easier to assemble later.
*Cutting where the box will sit: USE A SHARP KNIFE otherwise the pages will tear and snag.  USE A RULER to keep the lines straight.  You will probably only cut through a few pages at a time so be prepared for this to take a while - it is important that you do not rush this process or the clock box may not fit correctly. You can tidy the edges with tape, which also holds the pages together from the inside to make it more sturdy - in this tutorial I used green snipers tape (the tape is quite fabric-like) but you could use anything you like, even remnants of the pages already cut out.
*Where do I glue?:  It is a good idea to glue the front cover to the first page and also the last few pages with cut-outs on them.  If your book slants when stood up you can also glue the last few pages of the book and then glue them to the back cover to prevent slippage - this usually only occurs in old books
*Setting the time: when you replace your hands (hour, minute, second - from bottom to top) if you position them so they are all together eg. 12 o'clock, when you turn the dial to set the time the hands will be in the correct positions.
 
If you have any hints or tips you would like to add, or have noticed a mistake I have made, please feel free to leave a comment below
 
TOODLE-PIPS
xx

Saturday, September 11, 2010

Flower Bow Tutorial


As part of my upcycled xmas I'm going to make my own gift wrap accessories too.  Here's how to make these pretty flower bows - I made mine from the leftover squares that came out of the books I used to make book-clocks.  You will need paper, scissors and glue - thats it! 

I have since experimented with the number of petals and I have found that 9 is a good number but it entirely up to you as to how 'full' you want your flower to look.
You can upcycle old newspapers, magazines, and even junk mail too!
 
TOODLE-PIPS
xx

Wednesday, September 8, 2010

Second & Third Upcycled Xmas Presents Finished!!

Inspiration took hold of me a while back: whilst hunting through my local charity shops I'm amazed at just how many perfectly good books are donated.  I've always joked with my parents that they could always use them as firewood but on closer inspection some of them are truly beautiful.  From the dusty antique ones to the quirky titled ones, and from the picturesque covers to those with an 'in', the list of possibilities are endless. 

One perfect way to upcycle a favorite book is to turn it into a clock.  Having never attempted this before I sat down with a pencil, a ruler and a craft knife and set to work.  It took me the entire evening to finish it - mainly because I made so many mistakes along the way - even the crooked neck was worth it when I saw the final product.  Xmas present for my sister-in-law: she loves cookbooks and she's just had her new kitchen finished.


My favourite to date of the books I have scavenged has been this 1951 first edition book by Lloyd Morris entitled Incredible New York. Not only is the subject just perfect for my childhood best friend (and godmother to both of my children) due to an absolutely hilarious and calamitous escapade when she was younger, but the antique nature of the cover gives it an olde-worlde feel - perfect for her living room which is full of warmth, woods and texture. 

I keep forgetting to take photos as I go along - I promise I will on the next one and then I can post a tutorial - you shouldn't have to wait too long either - I've plenty to make before Christmas comes round!

TOODLE-PIPS
xx

Tuesday, September 7, 2010

Look Mummy....

When our daughter was a toddler she drew orange and black stripes all down her arms and over her face - apparently she was a tiger - it wouldn't have been so bad if she had not used permanent marker pen for the black stripes!! Thankfully after morphing into a zebra she faded clean and back into a little girl again. Naturally, it was only a matter of time before our son followed suit; today he found a green spiral stamper-pen and proceeded to cover his hands (front, back AND sides), extremely proud of his decorating skills he declared himself to be a snake. Yet again, the pen of choice turned out to be a permanent one!!

TOODLE-PIPS
xx

Monday, September 6, 2010

First Upcycled Xmas Present Finished!!

Ok, so this year I am going to make ALL the christmas presents for everybody - I did this last year but I had kind of a wool fetish on my road to recovery so most if not all presents were crocheted (no doubt I will post photos at a later date) this year I am proud to say NONE are made of wool in any way shape or form - woohoo!!

Both kids were finally back at school today so after doing 10miles at the gym then falling out with my lawnmower I sat down with a mans tie and an old watch (which in itself is kind of cool because not only is it mechanical and therefore NEVER needs batteries, its in Braille!!) some scissors, a needle and thread, and proceeded to experiment whilst attempting to watch a film {BlackOut - not as good as the write-up made it out to be}

As it was my first, I predicted mistakes and imperfections - naturally, this 'present' is actually for myself, and to gain reactions for research purposes only of course, I must give myself this present early so I can wear it imediately (I have it on as I write - and it is surprisingly silky smooth and comfy)
Also, I kind of wish I had used this paisely grey tie that I have instead - oh well, excuse to make another 'practise' one I suppose!

Admittedly I am uber-snoozle at taking photos - more tutorials on blogs and utube is in order me thinks...

TOODLE-PIPS
xx

Friday, September 3, 2010

Another Day, Another Dollar......

After being bombarded with tutorials and overloaded with info from kerb-crawling through other peoples blogs, my brain was inspired to embark on yet another project:  a new blog.  However, this isn't my first attempt, and no doubt it certainly wont be my last - infact, to date, this is my 7th blog - somewhere along the line I get busy, get bored or get ill and then it all just goes out the window.  My longest running blog was more of a diary, my attempt at making a mood chart more fun, but for once it conked out on me before I did - one day it just stopped working (much like me) - so now I'm going to do it all again, only this time I'm going to cut out the depression details and merely insert a picture to show my mood and label it: Deep Depression.  Other labels will include; Crazy Craftiness (showing the crafts I embark on), Exciting Exploits (trips or funny things that have happened to me), Day-2-Day (general daily stuff - if I rememeber) and Philosophy (moments of enlightenment that I sometimes have)
 
♥Sit back and enjoy, leave comments or tips, or just keep on trawling♥